Imagine waking up to the irresistible aroma of freshly baked bread, a golden-brown crust promising a soft, airy interior. With a Convection Bread Maker, this isn’t just a dream; it’s an everyday reality. For home bakers eager to elevate their craft, this innovative appliance offers a significant leap forward, delivering consistent, perfectly baked loaves that rival your favorite artisan bakery.
At its heart, a convection bread maker takes the convenience of automatic bread making and infuses it with advanced heating technology. While traditional bread makers rely on a single heating element, typically at the bottom, to bake the dough, a convection model introduces a small fan. This fan circulates hot air evenly throughout the baking chamber, ensuring that every part of your loaf, from top to bottom and side to side, receives consistent heat. The result? A perfectly uniform bake, a beautifully developed crust, and an end product that is simply superior in texture and appearance.
The Evolution of Bread Making: From Ancient Grains to Modern Innovation
The history of bread is as old as civilization itself, evolving from simple crushed grains and water baked on hot stones to the complex artisanal loaves we cherish today. For centuries, bread making was a labor-intensive process, demanding skilled hands for kneading and careful management of oven temperatures. The 20th century brought the convenience of electric stand mixers, but it wasn’t until the late 1980s that the automatic bread maker revolutionized home baking. These early machines handled everything from mixing to baking, transforming the time-consuming process into a simple “add ingredients and press start” affair.
However, these first-generation bread makers, while convenient, often produced loaves with a less-than-perfect crust or an uneven bake due to their singular heating element. Enter the convection bread maker – an innovation that borrows from the success of convection ovens to solve these very challenges. By incorporating a fan to circulate hot air, it marked a significant step forward, offering professional-quality results to the home baker and truly refining the art of effortless bread production.
Why Choose a Convection Bread Maker? The Benefits Unveiled
Opting for a convection bread maker brings a host of advantages that significantly enhance your bread-making experience and the quality of your finished loaves.
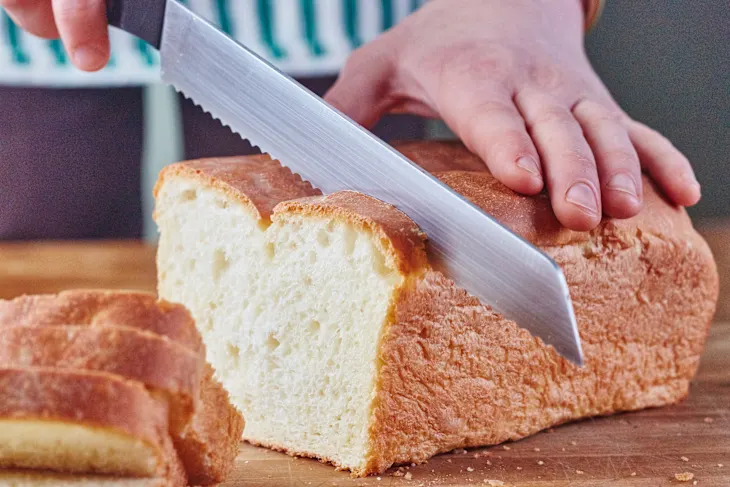
Even Baking and Superior Crust
What makes a convection bread maker bake more evenly?
The secret lies in its integrated fan, which actively circulates hot air around the baking chamber. This continuous movement of heat ensures that the entire loaf bakes uniformly, eliminating hot spots and cold zones that can plague traditional bread makers. The outcome is a consistent, golden-brown crust on all sides and a perfectly cooked interior.
This even heat distribution is crucial for achieving that coveted crunchy crust and tender crumb. Say goodbye to pale tops and overly dark bottoms; a convection bread maker creates a balanced bake that looks as good as it tastes.
Consistent Temperature Control
How does convection help maintain optimal baking temperature?
The fan not only distributes heat but also helps to maintain a more consistent internal temperature throughout the baking cycle. This precision is vital for yeast activation and dough development, contributing to a better rise and overall structure of the bread. Some models can even bake at slightly lower temperatures while achieving the same results as higher temperatures in conventional machines, potentially saving energy.
Versatility in Recipes and Settings
Modern convection bread makers are more than just one-trick ponies; they come equipped with an impressive array of pre-programmed settings to cater to diverse baking needs.
Can a convection bread maker handle gluten-free recipes?
Absolutely! Many convection bread makers feature dedicated gluten-free settings, specifically designed to accommodate the unique requirements of gluten-free doughs, which often need different kneading and rising times. You’ll also find programs for whole wheat, sweet breads, French bread, and even dough-only cycles for making pizza dough or dinner rolls to bake in your conventional oven. The enhanced heat control of the convection fan can be particularly beneficial for delicate gluten-free textures.
Convenience Features
Beyond their core baking prowess, convection bread makers often include thoughtful features designed to make your life easier.
What convenient features do convection bread makers offer?
Many models boast a “Delay Start” timer, allowing you to add ingredients in the evening and wake up to a freshly baked loaf in the morning. A “Keep Warm” function ensures your bread stays at the perfect serving temperature after baking. Some advanced convection bread makers even offer a power failure backup, holding your current cycle in memory for a short period if power is interrupted, so you don’t lose your loaf. Automatic fruit and nut dispensers are also common, adding mix-ins at precisely the right moment without you having to intervene.
Exploring Features and Types of Convection Bread Makers
When selecting a convection bread maker, you’ll encounter a range of features and designs, each catering to different preferences and kitchen setups.
Loaf Sizes
Most convection bread makers offer multiple loaf size options, typically ranging from 1 pound to 2 pounds, and sometimes even up to 2.5 pounds. This flexibility allows you to bake just enough for a single person or a larger loaf to feed a family.
Crust Settings
To perfectly match your preference, convection bread makers usually provide “light,” “medium,” and “dark” crust settings. The circulating hot air ensures that whichever setting you choose, the crust will be uniformly browned and deliciously crisp.
Pre-programmed Cycles
Beyond basic bread, expect a variety of specialized cycles. These can include settings for quick bread (no yeast), whole wheat, French, sweet, dough, pasta dough, jam, and even cake. The precision of a convection system can elevate the results of these diverse recipes.
Automatic Dispensers
For those who love to add fruits, nuts, or seeds to their bread, many models include an automatic dispenser that releases these ingredients at the optimal kneading stage, ensuring even distribution without crushing them.
Design and Materials
Convection bread makers are available in various aesthetics, from sleek brushed stainless steel to compact designs. Features like large viewing windows let you monitor your bread’s progress, and removable lids or bread pans make cleanup a breeze. Some models even feature horizontal loaf pans, producing a more traditional, rectangular loaf shape.
Essential Ingredients and Tools for Your Convection Bread Maker
To unlock the full potential of your convection bread maker, start with quality ingredients and the right approach.
Basic Bread Ingredients
What are the fundamental ingredients for bread machine baking?
The core components remain the same as traditional bread baking:
- Flour: Bread flour is often recommended for its higher protein content, which provides better structure. All-purpose flour can also be used for lighter loaves.
- Yeast: Active dry or instant yeast is crucial for leavening. Ensure it’s fresh for the best rise.
- Water (or other liquid): The temperature of your liquid is important – typically warm (around 105-115°F or 40-46°C) for activating yeast, but check your recipe.
- Salt: Essential for flavor and controlling yeast activity.
- Sugar (or honey): Feeds the yeast and adds subtle sweetness and browning.
- Fat (butter, oil, milk): Contributes to tenderness, flavor, and crust texture.
Importance of Measuring Accurately
Precision is key in bread making. Always use proper measuring cups and spoons, and for flour, consider weighing it using a kitchen scale for the most accurate results. This prevents issues like dense or crumbly bread.
Paddle Removal Tool (if applicable)
Most bread makers come with a kneading paddle that stays in the pan during baking. A small hook tool is often included to help you remove the paddle from the bottom of your baked loaf, minimizing the hole it leaves. Some advanced models feature collapsible paddles that retract before baking.
Mastering Your Convection Bread Maker: A Step-by-Step Guide
Using a convection bread maker is incredibly straightforward, but a few simple steps ensure perfect results every time.
- Prepare the Pan: Remove the bread pan from your convection bread maker. Ensure the kneading paddle is securely in place.
- Add Ingredients in Order: Most recipes recommend adding liquids first (water, milk, eggs), followed by dry ingredients (flour, sugar, salt), and finally the yeast, placed in a small well on top of the flour, away from the liquid and salt initially. This order prevents premature yeast activation.
- Return Pan to Machine: Securely place the bread pan back into the bread maker.
- Select Your Settings: Choose the appropriate program for your recipe (e.g., “Basic White,” “Whole Wheat,” “Gluten-Free”). Select your desired loaf size and crust color (light, medium, dark).
- Start the Cycle: Press the “Start” button. The machine will begin its automated process of mixing, kneading, rising, and baking.
- Monitor (Optional): Many convection bread makers have a viewing window. You can peek in to ensure the dough is forming correctly. Some models will beep to signal when it’s time to add any extra ingredients like fruits or nuts.
- Remove and Cool: Once the baking cycle is complete, the machine will typically beep. Carefully remove the hot bread pan from the bread maker using oven mitts. Invert the pan onto a wire rack to release the loaf.
- Cool Completely: Allow the bread to cool on the wire rack for at least 30-60 minutes before slicing. This allows the internal structure to set and steam to escape, preventing a gummy texture.
Tips, Tricks, and Delicious Recipes for Your Convection Bread Maker
Getting the most out of your convection bread maker involves a few expert insights and a willingness to experiment.
General Tips for Best Results
- Ingredient Temperature: Ensure liquids are at the recommended temperature. Cold liquids can inhibit yeast, while too hot can kill it.
- Dough Consistency: During the first kneading cycle, check the dough. It should form a smooth ball that cleans the sides of the pan. If it’s too sticky, add a teaspoon of flour at a time. If too dry, add a teaspoon of water.
- Avoid Opening Lid: Resist the urge to open the lid during the final rise and baking cycles, as this can cause the bread to collapse.
- Expert Insight: “The consistent, even heat circulation of a convection bread maker is a game-changer for home bakers,” says Eleanor Vance, a seasoned baker and culinary innovator. “It ensures a perfectly browned crust and a tender crumb every single time, truly bridging the gap between homemade and artisan loaves.”
Basic White Bread Recipe Example
Here’s a simple, reliable recipe to get you started:
- Ingredients:
- 1 cup warm water (105-115°F / 40-46°C)
- 2 tbsp unsalted butter, softened
- 1½ tsp salt
- 3 tbsp granulated sugar
- 3 cups bread flour
- 2¼ tsp active dry yeast
- Instructions:
- Place ingredients into the bread pan in the order listed by your convection bread maker’s manual (typically liquids first, then dry, yeast last).
- Select the “Basic White” or “White Bread” setting, a 1.5 lb loaf size, and your preferred crust color (medium is a good starting point).
- Press start and let your convection bread maker do its magic!
- Once done, remove the loaf and cool on a wire rack before slicing.
Ideas for Variations
Once you’ve mastered the basics, unleash your creativity!
- Whole Wheat Wonder: Substitute half or all of the white flour with whole wheat flour for a heartier loaf. Add a tablespoon of vital wheat gluten for extra rise.
- Sweet Sensations: Incorporate cinnamon, raisins, cranberries, or chocolate chips (use the mix-in dispenser if your machine has one) for delightful sweet breads.
- Savory Delights: Add dried herbs, sun-dried tomatoes, olives, or cheese to your dough for savory loaves perfect with dinner.
- Dough Cycle Magic: Use the “Dough” cycle to prepare perfect pizza dough, pretzel dough, or rolls that you can then shape and bake in your conventional oven.
The Joy of Homemade: Long-Term Benefits of Convection Bread Making
Beyond the sheer pleasure of a delicious slice, making your own bread with a convection bread maker offers a wealth of long-term advantages.
Health Benefits
Why is homemade bread healthier?
When you make bread at home, you control every ingredient. This means no artificial preservatives, unhealthy trans fats, or high-fructose corn syrup often found in commercial breads. You can choose organic flours, reduce sugar and salt content, and even experiment with healthier grains like spelt or oat flour, tailoring the bread to your dietary needs and preferences.
Cost-Effectiveness
While the initial investment in a convection bread maker exists, the long-term savings can be substantial. Buying specialty or artisan breads frequently adds up. Making your own loaves, especially basic varieties, is significantly cheaper, allowing you to enjoy fresh bread without breaking the bank.
Aromatherapy and Satisfaction
There’s an undeniable comfort and joy that comes from the aroma of baking bread filling your home. It’s a sensory experience that transforms your kitchen into a warm, inviting space. The satisfaction of pulling a perfect, golden loaf from your convection bread maker, knowing you created it with minimal effort, is incredibly rewarding. It’s a simple pleasure that nurtures both body and soul.
Serving and Savoring Your Freshly Baked Masterpiece
The journey doesn’t end when the bread maker beeps. How you treat your freshly baked loaf can greatly impact its taste and texture.
Cooling Before Slicing
Why is it important to cool bread completely before slicing?
It’s tempting to cut into a warm loaf immediately, but cooling is a critical step. As bread cools, the internal structure sets, and any remaining moisture redistributes. Slicing too early can result in a gummy texture and a misshapen slice. Give your bread at least an hour, or even longer for larger loaves, to cool on a wire rack.
Storage Tips
For optimal freshness, store your cooled bread at room temperature in an airtight container, a bread box, or a tightly sealed plastic bag. Avoid refrigerating bread, as it tends to dry out and become stale more quickly. If you bake large loaves or want to extend freshness, consider slicing and freezing portions for later.
Serving Suggestions
A slice of warm, homemade bread from your convection bread maker needs little adornment. Enjoy it simply with:
- A pat of good butter
- Your favorite jam or marmalade
- A drizzle of olive oil and a pinch of sea salt
- As the base for an incredible sandwich, elevating your lunch to a gourmet experience
- Toasted and topped with avocado or eggs for a wholesome breakfast
Frequently Asked Questions (FAQ)
Is a convection bread maker worth the investment?
Many home bakers find a convection bread maker to be an excellent investment, particularly for those seeking consistently superior results with an even crust and texture. While they may have a slightly higher price point than basic models, the quality of the bread produced often justifies the cost.
Can I use regular bread maker recipes in a convection model?
Yes, absolutely! Most standard bread machine recipes will work wonderfully in a convection bread maker. The convection fan will simply enhance the baking process, potentially leading to a more even bake and better crust. You might find you can even reduce the baking time slightly or adjust crust settings for a less dark finish, but always start with the recipe’s recommendations.
How do I clean my convection bread maker?
Cleaning is typically straightforward. The bread pan and kneading paddle are usually non-stick and can be washed with warm, soapy water. Always refer to your specific model’s manual for detailed cleaning instructions, but generally, avoid abrasive cleaners to protect the non-stick coating. The exterior can be wiped down with a damp cloth.
What causes dense bread in a bread maker?
Dense bread can be caused by several factors, including incorrect ingredient measurements (especially too much flour or too little liquid), old or inactive yeast, too much salt inhibiting yeast, or issues with dough rising (e.g., too cold an environment, opening the lid during rise cycles). Accurate measurements and fresh ingredients are key.
Can convection bread makers make gluten-free bread?
Yes, many convection bread makers include a dedicated “Gluten-Free” setting. These settings are optimized with specific kneading, rising, and baking times to suit the unique properties of gluten-free flours, which often require different handling than wheat-based doughs. The even heat of convection can further assist in baking gluten-free loaves thoroughly.
Conclusion
The convection bread maker truly represents the pinnacle of home bread making convenience, blending automation with advanced baking technology to deliver exceptional results. It’s more than just an appliance; it’s a gateway to a world of aromatic, perfectly crusted, homemade loaves, transforming your kitchen into a personal bakery. By understanding its unique advantages – from even baking and superior crust development to versatile programming and thoughtful features – you’re well-equipped to choose the perfect convection bread maker and embark on a delightful journey of culinary creation. So go ahead, measure your ingredients, press a button, and prepare to savor the unparalleled joy of fresh, homemade bread, baked to perfection every time.