There’s something uniquely comforting about the aroma of freshly baked bread wafting through your home. It’s a scent that promises warmth, sustenance, and a touch of home-baked love. For many, the thought of baking bread from scratch seems daunting, a time-consuming task relegated to experienced bakers. But what if there was an appliance designed to simplify this ancient art, bringing the joy of homemade bread to every kitchen? Enter the Bella Bread Maker, a modern marvel that transforms complex baking into an effortless experience. This guide will walk you through everything you need to know to unlock the full potential of your Bella bread maker and delight in delicious, artisanal loaves with minimal effort.
The Evolution of Bread Makers: A Journey to Your Kitchen Counter
For centuries, bread making was a laborious process, demanding hours of kneading, proofing, and baking. The industrial revolution brought mass-produced bread, convenient but often lacking the character and quality of homemade. The late 20th century saw the emergence of a revolutionary kitchen appliance: the automatic bread maker. This innovation promised to bridge the gap, offering the ease of automation with the wholesome goodness of homemade. Modern bread makers, like the Bella bread maker, are the culmination of this journey, featuring advanced programming and user-friendly designs that empower even novice bakers to create culinary masterpieces.
Introducing the Bella Bread Maker: Your Gateway to Fresh Baking
The Bella bread maker, particularly popular models like the Pro Series 2-lb. Bread Maker, is designed with the home baker in mind. It’s an appliance that understands the balance between convenience and quality, making it a favorite for those eager to embrace homemade goodness without the fuss. Imagine waking up to the smell of warm bread, perfectly baked and ready to be enjoyed. With a Bella bread maker, this isn’t just a dream; it’s an everyday reality.
Key Features That Stand Out
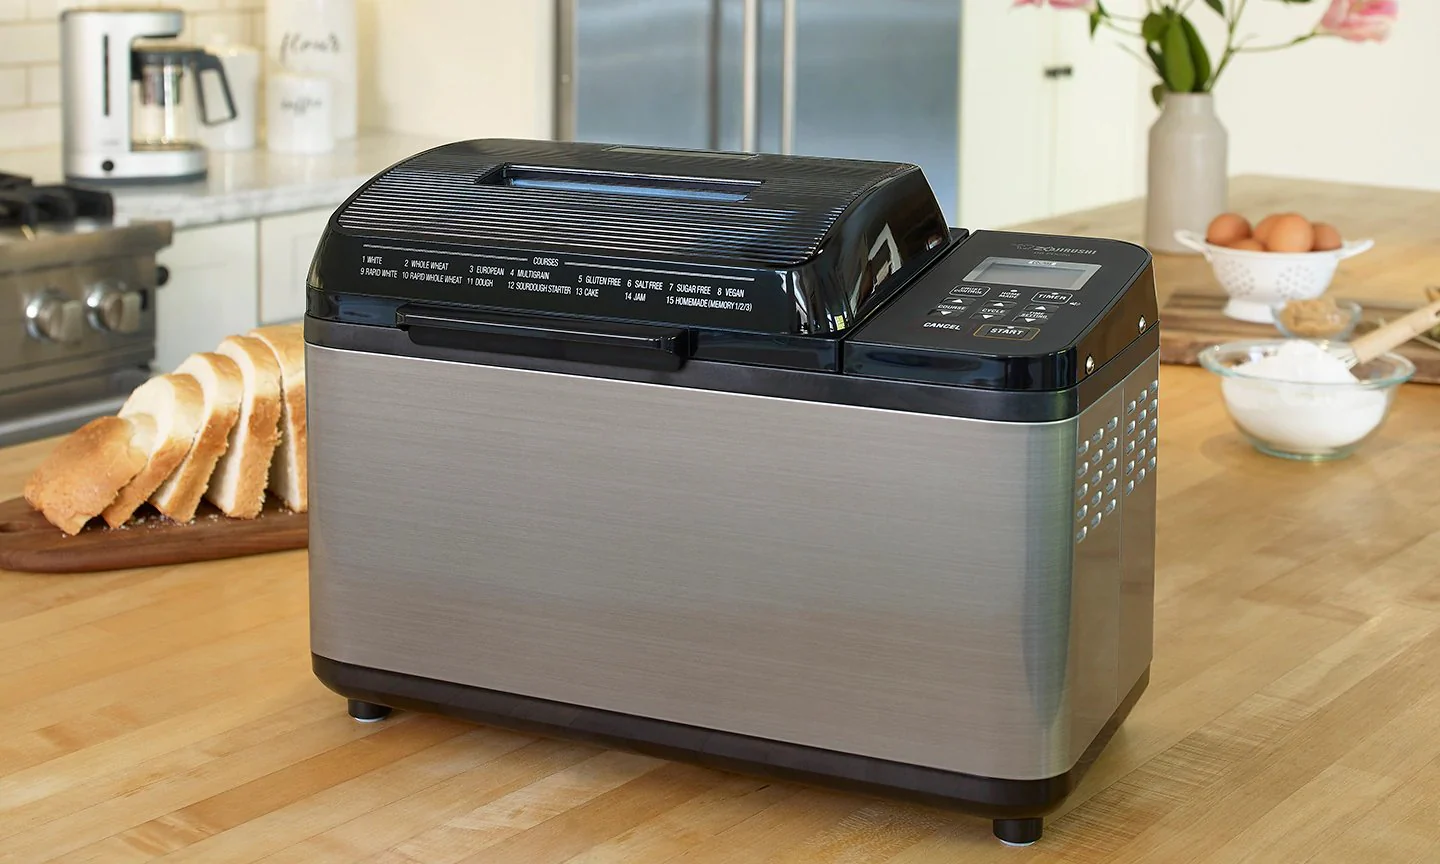
A hallmark of the Bella bread maker is its array of thoughtful features that streamline the baking process. Most models boast a generous 2-pound loaf capacity, ideal for families or for those who enjoy having fresh bread throughout the week. You’ll find between 12 and 15 pre-programmed cycles, including staples like Basic, French, and Whole Wheat, alongside specialized options for Quick bread, Sweet bread, and even Gluten-Free varieties. This versatility ensures that your Bella bread maker can handle almost any recipe you throw its way.
Customization is at your fingertips with selectable loaf sizes (typically 1.5 lb or 2 lb) and three crust color options—light, medium, or dark—allowing you to tailor your bread to perfection. The convenience extends further with a 13-hour delay start timer, meaning you can load your ingredients the night before and wake up to a freshly baked loaf. A 60-minute keep-warm function ensures your bread stays at the perfect temperature until you’re ready to slice it. Plus, a large viewing window lets you watch the magic happen, from kneading to rising to baking.
Beyond Bread: Versatile Functions
While “bread maker” is in its name, the Bella bread maker is often a multi-talented kitchen companion. Many models feature programs for preparing dough (perfect for pizza, pasta, or rolls), making jams, baking cakes, and some even include a yogurt function. This expanded functionality makes your Bella bread maker a truly versatile appliance, maximizing its utility in your kitchen.
Essential Ingredients and Tools for Bella Bread Making
To create beautiful loaves with your Bella bread maker, a few basic ingredients and tools are all you need.
The Pantry Staples
- Flour: The foundation of your bread. All-purpose flour is common, but experiment with bread flour for chewier loaves, whole wheat flour for healthier options, or specialized gluten-free flour blends.
- Yeast: The magical ingredient that makes bread rise. Ensure your yeast is fresh and active for best results. Bread machine yeast, instant yeast, or active dry yeast can all be used, often with slight adjustments to liquid temperature.
- Water (or other liquids): Crucial for activating the yeast and forming the dough. Always use the temperature specified in your recipe, as it directly impacts yeast activity. Milk, buttermilk, or even fruit juice can also be used.
- Salt: Essential for flavor and for regulating yeast activity. Don’t skip it!
- Sugar (or other sweeteners): Feeds the yeast and adds subtle sweetness and browning to the crust. Honey or maple syrup can also be used.
- Fat (oil or butter): Contributes to a softer crumb, richer flavor, and helps keep the bread fresh longer.
Your Baking Companions
The Bella bread maker typically comes with a non-stick removable bread pan and a kneading paddle. You’ll also usually find a measuring cup, a measuring spoon, and a handy hook to remove the paddle from your baked loaf. A rubber spatula can be useful for scraping down sides, and a wire cooling rack is essential for cooling your bread evenly after baking.
A Step-by-Step Guide: Baking with Your Bella Bread Maker
Making bread with your Bella bread maker is incredibly straightforward. Follow these steps for consistent success:
1. Preparation is Key
- Assemble the Pan: Ensure the non-stick bread pan is clean and the kneading paddle is securely attached to the shaft inside the pan, with its wide base facing down.
- Measure Precisely: Accuracy is vital in bread making. Measure all your ingredients carefully.
- Layer Correctly: This is crucial for yeast activation and even mixing. Always add liquids first (water, milk, oil), followed by dry ingredients (flour, sugar, salt). Finally, make a small indentation in the dry ingredients and add the yeast there, ensuring it doesn’t touch the wet ingredients directly at first. This prevents premature activation.
2. Selecting Your Perfect Program
- Place the Pan: Securely place the loaded bread pan back into the baking chamber of your Bella bread maker and close the lid.
- Choose Your Cycle: Plug in the machine. The display will show default settings (e.g., Program 1: BASIC, 2 lb loaf, medium crust). Press the MENU button to scroll through the pre-programmed cycles until you find the one that matches your recipe (e.g., “Basic,” “Whole Wheat,” “Gluten Free”).
- Customize Loaf and Crust: Use the LOAF button to select your desired bread size (1.5 lb or 2 lb) and the COLOR button for your preferred crust (light, medium, dark).
- Set the Delay (Optional): If you want your bread ready at a specific time later, use the Delay Start timer.
- Start Baking: Press the START/STOP button to begin the cycle.
3. The Waiting Game (and the Rewards!)
The Bella bread maker will now take over, mixing, kneading, rising, and baking your bread. Resist the urge to open the lid during the baking cycle, especially during the rising phase, as this can cause the loaf to collapse. Once the cycle is complete, the machine will usually beep and automatically switch to a “keep warm” function for up to 60 minutes.
- Remove the Bread: Carefully remove the hot bread pan using oven mitts. Invert the pan onto a wire cooling rack and gently shake until the loaf slides out. Use the paddle removal hook to extract the kneading paddle if it’s still embedded in the bread.
- Cool Completely: Allow the bread to cool for at least 30-60 minutes on the rack before slicing. This is vital for the internal structure to set and for easier slicing.
Tips and Tricks for Bella Bread Maker Success
Even with an automatic appliance, a few insider tips can elevate your baking experience.
Troubleshooting Common Issues
- Dense Bread/Doesn’t Rise: This often points to inactive yeast or incorrect liquid temperature. Ensure your yeast is fresh and use liquids at the temperature specified in the recipe. Also, verify that the yeast doesn’t touch the wet ingredients prematurely. As expert baker, Clara Jenkins, advises, “Yeast is a living organism; treat it kindly with the right temperature and a separate start, and your bread will thank you with a beautiful rise.”
- Kneading Paddle Stuck: It’s common for the paddle to get baked into the bottom of the loaf. Use the provided hook to remove it gently while the bread is still warm to minimize tearing.
- Non-Stick Coating Issues: To preserve the non-stick coating of your Bella bread maker pan and paddle, avoid abrasive cleaners or metal utensils. Wash by hand with warm, soapy water and a soft sponge.
Creative Recipe Variations
Don’t be afraid to experiment beyond the basic recipes in your manual.
- Gluten-Free Delights: The Bella bread maker’s gluten-free setting is a game-changer for those with dietary restrictions. Remember that gluten-free doughs have a different consistency and typically don’t rise as much as traditional wheat breads.
- Whole Wheat Wonders: Use the whole wheat cycle for heartier, fiber-rich loaves. You might need slightly more liquid for whole wheat flour.
- Sweet & Savory Additions: During the “add-ins” beep (if your machine has one), incorporate nuts, dried fruits, chocolate chips, cheese, herbs, or olives to customize your loaves.
Maintenance for Longevity
Regular cleaning ensures your Bella bread maker continues to perform optimally. Always unplug the machine and allow it to cool before cleaning. Wipe the exterior with a damp cloth. Clean the bread pan and kneading paddle with warm, soapy water. Avoid submerging the main unit in water.
The Irresistible Benefits of Baking Your Own Bread
Why go through the “trouble” of making bread when you can buy it? The benefits of using a Bella bread maker go far beyond mere convenience.
- Healthier Choices: When you bake your own bread, you control every ingredient. This means no artificial preservatives, unhealthy oils, or excessive sugars. You can opt for organic flours, add nutrient-rich seeds, or reduce salt content to suit your dietary needs.
- Economic Sense: While there’s an initial investment in the Bella bread maker and ingredients, over time, baking your own bread can be significantly more cost-effective than consistently buying artisanal or specialty loaves from bakeries or grocery stores.
- The Comfort and Aroma of Home: There’s an undeniable sensory pleasure in homemade bread. The warmth, the soft texture, and that incomparable aroma create a cozy, inviting atmosphere that store-bought bread simply can’t replicate. It’s a small luxury that makes everyday life a little sweeter.
Savoring Your Masterpiece: Enjoying Homemade Bella Bread
Once your beautiful loaf emerges from the Bella bread maker, the real fun begins: enjoying it!
Perfect Pairings
- Simple Pleasure: Slice it thick and spread with butter, jam, or honey.
- Meal Companion: Serve alongside soups, stews, or salads.
- Sandwich Supreme: Elevate your daily sandwich with truly fresh bread.
- Toast Perfection: Golden, crispy toast, fresh from your own kitchen.
Storage Tips
Homemade bread, free of preservatives, is best enjoyed fresh. Store it in an airtight container or bread box at room temperature for 2-3 days. For longer storage, slice the cooled bread and freeze it in an airtight bag. You can then toast slices directly from the freezer.
Frequently Asked Questions (FAQ) About Your Bella Bread Maker
How do I prevent my Bella bread from being too dense?
Ensure your yeast is fresh and active, and always add it last, creating a small well in the dry ingredients to prevent premature contact with liquids. Use the correct liquid temperature specified in your recipe, as hot water can kill yeast, and cold water can inhibit its activation.
Can I use any recipe in my Bella bread maker?
While many recipes are compatible, it’s best to use recipes specifically designed for bread makers, as they account for precise ingredient ratios and the machine’s mixing and kneading cycles. However, you can adapt traditional recipes with some experimentation.
What does the express cycle do?
The express cycle on a Bella bread maker allows you to bake a fresh loaf in under two hours. It’s ideal for when you need bread quickly, though the texture might be slightly different from longer cycles.
How do I clean my Bella bread maker?
Always unplug and cool your Bella bread maker before cleaning. Wipe the exterior with a damp cloth. The removable bread pan and kneading paddle should be washed by hand with warm, soapy water and a non-abrasive sponge to protect the non-stick coating. Avoid putting the main unit in water.
What does the delay start function mean?
The 13-hour delay start function lets you add ingredients to your Bella bread maker and program it to start baking at a later time. This is perfect for waking up to fresh bread or having it ready right when you get home from work.
Can I make gluten-free bread in the Bella bread maker?
Yes, the Bella bread maker typically includes a dedicated gluten-free cycle. This setting is optimized for the unique requirements of gluten-free flours, which often need different kneading and rising times compared to wheat-based doughs.
Why is the kneading paddle sometimes stuck in the loaf?
It’s common for the kneading paddle to become embedded in the bottom of the baked loaf. Use the provided paddle removal hook to carefully extract it while the bread is still warm. Removing it when the bread is hot helps prevent a larger tear.
Conclusion
The Bella bread maker is more than just an appliance; it’s an invitation to a world of homemade baking, convenience, and delicious discovery. From the simplest basic loaf to experimental sweet breads or savory doughs, your Bella bread maker stands ready to transform your kitchen into a bustling bakery. Don’t let the thought of complex baking hold you back. Embrace the ease, savor the aromas, and relish the incredible taste of fresh, homemade bread, baked with love and a little help from your trusty Bella bread maker. It’s time to get baking and share the warmth!