There’s something uniquely comforting about the aroma of freshly baked bread wafting through your home. It’s a simple pleasure that many believe is reserved for seasoned bakers or those with high-end kitchen gadgets. But what if you could experience this everyday luxury without breaking the bank? Enter the cheap bread maker. For budget-conscious foodies and busy families, an affordable bread machine might just be the secret ingredient to delicious, homemade loaves. In a world where every penny counts, investing in a cheap bread maker offers an accessible entry point to the satisfying world of home baking, transforming basic ingredients into a culinary delight with minimal effort.
|
Our Picks for the Best Bread Maker in 2026
As an Amazon Associate I earn from qualifying purchases.
|
||
| Num | Product | Action |
|---|---|---|
| 1 | Amazon Basics Programmable Bread Maker, 2 Pound Non-Stick Automatic Bread Making Machine, 14 Settings for Breads, Doughs, Gluten-Free Options and More, LCD Display, White |

|
| 2 | Elite Gourmet EBM8103B Programmable Bread Maker Machine 3 Loaf Sizes, 19 Menu Functions Gluten Free White Wheat Rye French and more, 2 Lbs, Black |
|
| 3 | Rosewill 25-in-1 Automatic Bread Maker Machine with 3 Loaf Size up to 2 Lb, 700W High Power Dual Heater Bread Maker with BPA-free Nonstick Coating Pan, Max 15 Hours Delay Timer, Low Noise - Gray |
|
| 4 | Elite Gourmet EBM8103M Programmable Bread Maker Machine 3 Loaf Sizes, 19 Menu Functions Gluten Free White Wheat Rye French and more, 2 Lbs, Mint |
|
| 5 | KITCHENARM 29-in-1 SMART Bread Machine with Gluten Free Setting 2LB 1.5LB 1LB Bread Maker Machine with Homemade Cycle - Stainless Steel Breadmaker with Recipes Whole Wheat Bread Making Machine |
|
| 6 | 2LB Bread Maker Machine, OSIPOTO 17 in 1 Automatic Stainless Steel Bread Machine, Non-stick, Beginner-Friendly Controls, 15 Hour Timer, Easy to Clean Low Noise, High Success Rate for Homemade Bread |
|
| 7 | Neretva Bread Maker, 20-IN-1 2LB Bread Machine Dual Heater Bread Maker Machine Automatic with Nonstick Ceramic Pan, 15H Timer & 1H Keep Warm Set, Low Noise, Stainless Steel Breadmaker Recipe-Green |
|
| 8 | Cuisinart Bread Maker Machine, Stainless Steel Automatic Bread Machine with 12 Menu Options, 3 Loaf Sizes up to 2 Lb., 3 Crust Colors, Removable Nonstick Baking Pan & Kneading Paddle, CBK-110NAS |
|
| 9 | KBS Pro 710W Bread Maker, 2LB 17-in-1 Automatic Bread Machine with Healthy Ceramic Pan, Nut Dispenser, Tempered Glass Touch Panel, Stainless Steel Housing,3 Crust Colors, 15H Timer&Keep-Warm, Recipe |
|
| 10 | Cuisinart Bread Maker Machine, Stainless Steel Convection Bread Machine with 16 Menu Options, 3 Loaf Sizes Up to 2 Lb., 3 Crust Colors, Includes Measuring Cup, Spoon & Kneading Hook, CBK-210 |
|
A Brief History of Bread Makers: From Luxury to Everyday Essential
The concept of automated bread making isn’t new, but its journey from a niche, expensive appliance to a household staple has been remarkable. Early bread makers emerged in the late 20th century, promising convenience for those who loved the idea of homemade bread but lacked the time or skill for traditional baking. Initially, these machines were a luxury, often bulky and costly. However, as technology advanced and manufacturing became more efficient, bread makers evolved. Today, the market is rich with options, including a fantastic array of cheap bread maker models that deliver reliable performance without the hefty price tag, making fresh bread truly accessible to everyone.
Why Consider a Cheap Bread Maker? The Undeniable Perks
Opting for an affordable bread maker brings a host of benefits that extend beyond just saving money on the initial purchase.
Cost Savings: Crunching the Numbers
One of the most compelling reasons to buy a cheap bread maker is the potential for significant long-term savings. While there’s an upfront cost, the ingredients for a homemade loaf are surprisingly inexpensive. Many sources indicate that making your own bread can cost as little as $0.30-$0.94 per loaf, a stark contrast to store-bought artisan breads that can easily run $4-$7 or more. A typical $60 cheap bread maker could pay for itself after around 64 uses, especially if your family consumes bread regularly. This means that over time, your inexpensive machine becomes a money-saving champion, transforming cheap bread maker ingredients into delicious, budget-friendly meals.
Ultimate Convenience: Time-Saving Magic
Let’s be honest, hand-kneading dough is a labor of love, but it’s also time-consuming. A bread maker takes care of all the messy, laborious steps for you: mixing, kneading, rising, and baking. All you do is add the ingredients, select a program, and press start. Imagine waking up to the irresistible scent of fresh bread, ready for breakfast, thanks to a delayed start timer. This “set it and forget it” convenience is a huge advantage for busy individuals and families, making homemade bread a realistic daily treat rather than a weekend project.
Healthier Choices, Your Way
With a cheap bread maker, you have complete control over what goes into your family’s food. Forget about preservatives, artificial additives, and excess sugar often found in commercial loaves. You can choose organic flours, add nutrient-rich seeds, or reduce salt content to suit your dietary needs. This transparency ensures you’re providing a healthier option for yourself and your loved ones, a significant benefit that transcends the cost of the machine itself.
Beyond the Loaf: Versatility on a Budget
Don’t let the name “bread maker” fool you; these machines are often much more versatile than you might think. Even many cheap bread maker models come with a variety of settings that allow you to make more than just basic loaves. You can prepare dough for pizza, pasta, dinner rolls, and even sweet treats like cinnamon buns. Some machines also feature settings for jams, cakes, and gluten-free breads, expanding your culinary repertoire without needing additional specialized appliances.
What to Look For in an Affordable Bread Maker: Key Features that Matter
When hunting for a cheap bread maker, knowing what features truly matter can help you make a smart purchase.
Loaf Size and Shape: Vertical vs. Horizontal
One common difference in bread makers, especially at lower price points, is the loaf shape. Many affordable models produce a “vertical” or “blocky” loaf, which can be taller and narrower than traditional bakery bread. While perfectly edible, this shape might be less ideal for standard sandwiches. Some slightly pricier budget models might offer a horizontal pan for a more conventional loaf shape. Consider your primary use case: if sandwich slices are paramount, a horizontal pan might be worth a slightly higher investment. Most machines offer loaf sizes ranging from 1 to 2 pounds.
Programmable Settings: Basic Needs vs. Fancy Extras
Even a cheap bread maker typically includes essential programs like basic white, whole wheat, French bread, and dough cycles. More advanced, but still affordable, machines might offer gluten-free, rapid bake, or custom settings. For beginners, a machine with straightforward, pre-programmed settings is often sufficient. If you enjoy experimenting, look for a model with a few extra options or even a “homemade” cycle that allows for some customization.
Ease of Use and Cleaning
A good cheap bread maker should be intuitive. Look for clear displays, easy-to-press buttons, and a user manual with simple instructions. Cleaning is also a factor; removable, nonstick bread pans are a huge plus. While most bread machines are relatively easy to clean, some paddles can occasionally get stuck with dried dough, requiring a little extra attention.
Durability and Countertop Footprint
While you’re looking for a cheap bread maker, you still want a machine that will last. Read reviews to gauge the general build quality. Some lighter-weight, budget-friendly models might feel a bit less robust or even wobble during the kneading cycle. Also, consider your kitchen space. Bread makers aren’t always compact. Look for models described as “compact” or “lightweight” if counter space is a premium. The Cuisinart Compact and Amazon Basics models are often praised for their smaller footprints.
Top Contenders for Your Kitchen: Best Cheap Bread Makers Reviewed
Many brands offer excellent value without compromising on quality. Here are a few often highlighted in the “best cheap bread maker” category:
- Elite Gourmet Maxi-Matic Programmable: Praised for solid performance with white and wheat bread, easy to use, and a good value.
- Amazon Basics 2-Pound Nonstick Bread Machine: A top pick for budget-conscious buyers, it’s simple, lightweight, and perfect for beginners, delivering delicious loaves at a great price. It offers 14 settings, including gluten-free, cake, jam, and yogurt.
- Oster ExpressBake: Often recognized for its consistency and ability to handle various types of bread, including gluten-free, despite its affordable price (around $60). It also features a “Fast Bake” option.
- Russell Hobbs 23620 Compact Fast: Frequently cited as a “best value” option, capable of making up to a 1kg loaf with 12 pre-programmed recipes and speedy bake functions.
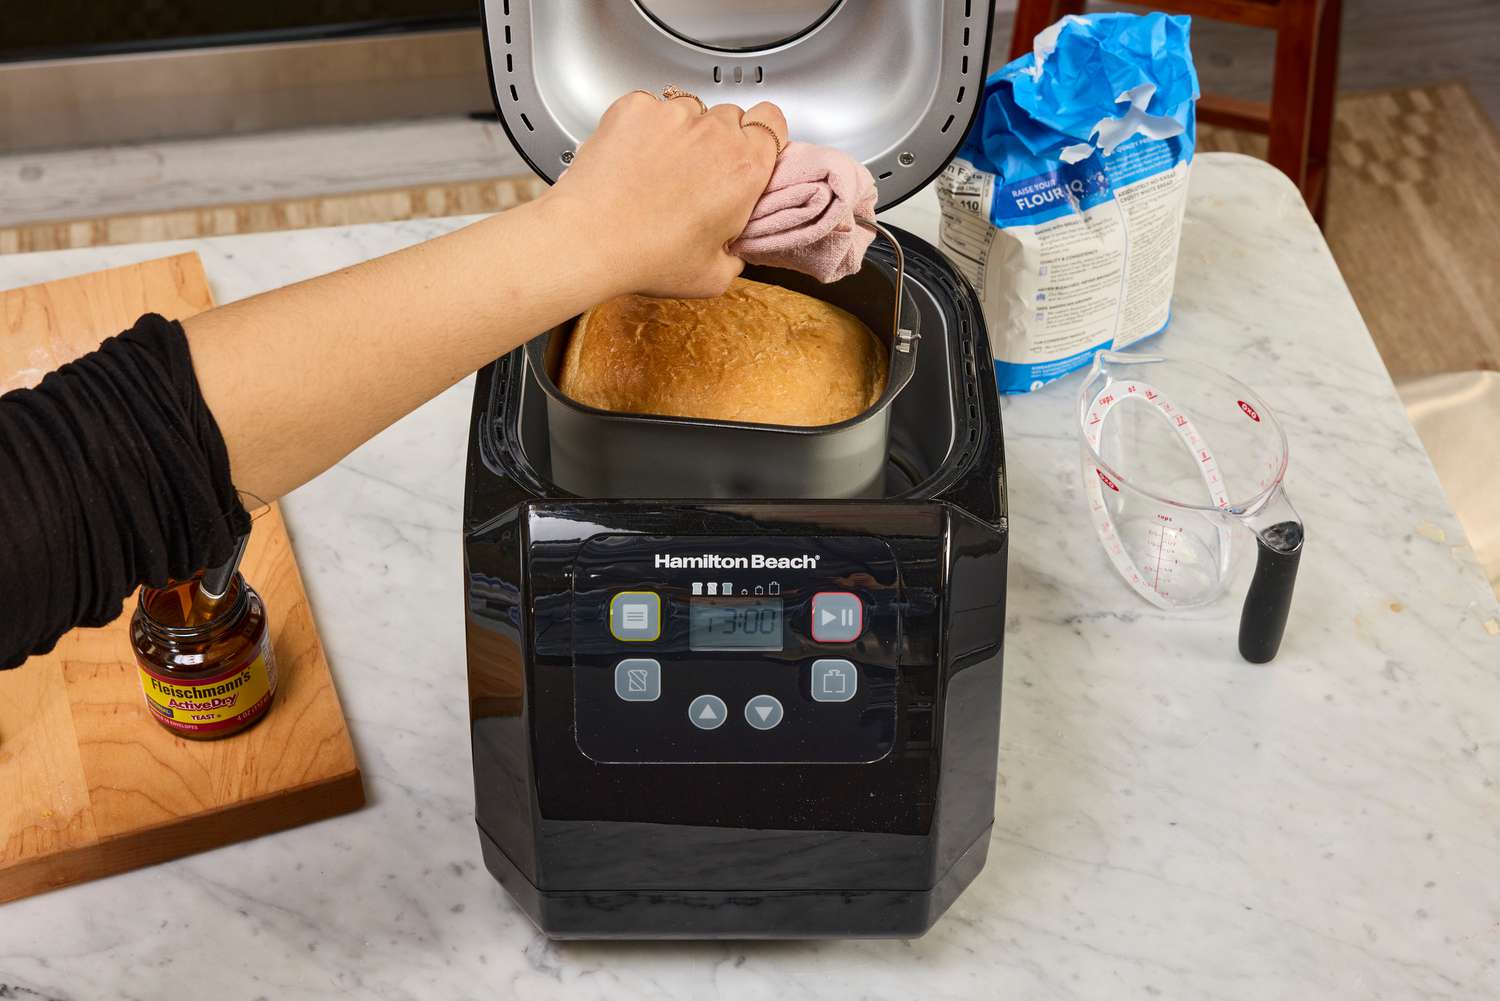
- Hamilton Beach: While specific popular models like the 29882 might be discontinued, Hamilton Beach has a history of producing dependable and inexpensive bread makers, and newer models like the 29890 continue that tradition with multiple settings and features.
“Even an inexpensive bread maker can produce consistently excellent results if you choose wisely and follow the instructions,” says expert baker, Clara Jenkins. “It’s about finding the right balance of features for your needs, not necessarily spending a fortune.”
Getting Started: Basic Ingredients and Essential Tools
Making bread with a cheap bread maker is wonderfully straightforward. You don’t need a pantry full of exotic ingredients or a drawer full of specialized tools.
The Foundation: Flour, Yeast, Water, Salt, Sugar, Oil
The core ingredients for most bread machine recipes are simple:
- Flour: Bread flour is recommended for a better rise and less dense texture compared to all-purpose flour.
- Yeast: Active dry yeast or rapid-rise yeast works well. Some machines specifically mention “bread machine yeast.”
- Water: Warm water (around 110°F/45°C) is crucial for activating the yeast.
- Salt, Sugar, Oil: These add flavor, aid in browning, and affect texture.
Beyond the Basics: Measuring Spoons, Cups, Digital Scale
While measuring cups and spoons are fine, a digital kitchen scale is highly recommended for accuracy, especially with flour. Weighing ingredients ensures consistent results and helps prevent dense loaves. Other useful tools include oven mitts for removing the hot bread pan and a wire rack for cooling.
How to Master Your Cheap Bread Maker: A Step-by-Step Guide
Using a bread maker is incredibly easy, but a few simple steps ensure perfect results every time.
- Layering Ingredients Correctly: Most recipes call for adding liquids first (water, oil), then dry ingredients like salt and sugar, followed by flour. The yeast should be added last, typically on top of the flour, making a small indentation and ensuring it doesn’t directly touch the water or salt initially. This prevents premature activation or inhibition of the yeast.
- Choosing the Right Setting: Consult your machine’s manual for recommended settings. For a basic white loaf, the “Basic” or “White Bread” setting is usually appropriate. Select your desired loaf size and crust color (light, medium, dark).
- The Golden Rule: Don’t Peek! Once the cycle begins, resist the urge to open the lid, especially during the kneading and rising phases. This can affect the temperature and humidity inside, potentially impacting your loaf. The machine will do its work in silence (or with a bit of kneading noise).
- Cooling for Perfection: When the baking cycle finishes, carefully remove the bread pan with oven mitts. Allow the loaf to cool in the pan for about 10 minutes, then invert it onto a wire rack to cool completely. This step is vital for a good texture and easy slicing. Slicing hot bread can result in a gummy texture.
Tips, Tricks, and Budget-Friendly Recipes for Your Machine
Even a cheap bread maker can produce fantastic results with a few helpful hints and the right recipes.
Troubleshooting Common Issues
- Dense Bread: This is often due to too much flour or insufficient yeast activation. Ensure you measure flour correctly (weighing is best) and that your water is at the right temperature for yeast.
- No Rise: Check your yeast’s expiry date and ensure it’s kept separate from salt during initial layering.
- Loud Kneading/Wobbling: Some budget machines might be noisier. Ensure it’s on a stable, flat surface.
Quick Bread Machine Hacks
- Dough Setting for Everything: Use the “Dough” setting to prepare dough for pizza, focaccia, dinner rolls, or even homemade noodles. You then remove the dough, shape it, and bake it in your conventional oven for artisanal results.
- Enrich Your Bread: Add a tablespoon of milk powder or a bit of potato flakes to your recipe for an extra soft crumb and improved shelf life.
Delicious & Affordable Recipes
Starting with a simple white bread recipe is ideal. Here’s a basic framework for a 1.5-pound loaf:
- 1 cup + 3 tablespoons warm water (approx. 110°F/45°C)
- 2 tablespoons vegetable oil
- 1 ½ teaspoons salt
- 2 tablespoons sugar
- 3 ¼ cups bread flour
- 2 teaspoons active dry yeast
Add ingredients in order (water, oil, salt, sugar, flour, then yeast) to your bread pan. Select the basic cycle, 1.5 lb loaf, and medium crust.
Beyond white bread, experiment with whole wheat, oatmeal bread, or even simple quick breads like banana bread using your machine’s dedicated settings or dough cycle.
The Sweet Reward: Enjoying Your Homemade Bread
The moment your cheap bread maker beeps, signaling a fresh loaf is ready, is incredibly satisfying. But how best to enjoy and preserve your creation?
Serving Suggestions and Pairings
A slice of warm, homemade bread with a dollop of butter is a classic. But don’t stop there!
- For Breakfast: Toast slices for a perfect accompaniment to eggs or jam.
- With Meals: Serve alongside soups, stews, or salads. A crusty slice can elevate any simple dish.
- Sandwiches: Once cooled, your homemade bread makes fantastic sandwiches, superior in taste and texture to many store-bought options.
Storage Tips for Freshness
Homemade bread, without preservatives, typically has a shorter shelf life than store-bought. It’s best enjoyed within 2-3 days at room temperature. For longer storage, consider slicing the cooled loaf and freezing individual slices. This allows you to pull out just what you need, minimizing waste and ensuring you always have fresh bread on hand.
Frequently Asked Questions about Cheap Bread Makers
Are cheap bread makers as good as expensive ones?
While high-end bread makers often offer more features, quieter operation, and traditional loaf shapes, many cheap bread maker models excel at producing consistently good basic loaves. The primary difference often lies in extra programs, loaf pan shape, and overall build quality, rather than the core ability to make tasty bread.
How much money can I really save with a cheap bread maker?
You can save a considerable amount in the long run. A homemade loaf often costs less than a dollar, significantly cheaper than store-bought bread, especially specialty or organic varieties. The machine itself can pay for itself within a few months to a year, depending on how frequently you bake.
Can I make gluten-free bread in a cheap machine?
Yes, many affordable bread makers, like the Amazon Basics and Oster ExpressBake, include a dedicated gluten-free setting. While gluten-free recipes can sometimes be more sensitive, these machines provide the specific environment needed for a good rise and bake.
What are the most common mistakes beginners make with a cheap bread maker?
Common mistakes include incorrect ingredient measurements (especially flour), using expired yeast, or opening the lid during the baking cycle. Always follow the recipe precisely, ensure fresh ingredients, and trust the machine to do its work.
How long does a cheap bread maker last?
The lifespan of a cheap bread maker varies by brand and usage. With proper care and cleaning, many can last for several years. Some users even report inexpensive machines lasting for a decade or more, proving their durability and value.
Your Journey to Affordable, Fresh Bread Starts Here
The allure of a warm, fragrant loaf of bread, made right in your kitchen, is undeniable. A cheap bread maker makes this dream an affordable and effortless reality. It’s more than just a kitchen appliance; it’s an investment in convenience, health, and the simple joy of homemade goodness. So, go ahead, explore the world of the cheap bread maker. Your kitchen (and your taste buds) will thank you.